How to Make a Banquette

I’m pretty sure by now, most of you guys have seen my dining room nook. It’s the Beyonce of banquette’s if you ask me. Although, I might be biased. If you have a keen eye, you may have also noticed that my built-in banquette bench has in seat storage. So really this banquette is it’s the ultimate fusion of form and function.
Believe it or not, building your very own banquette can be done rather easily - mine was custom made with the help of some friends during my home renovation. But, never fear. I documented the entire process along the way. Anyone can do it - I swear! The thing is, a banquette can be a great solve for adding tons of comfortable seating when space is fairly limited like it is in my eat-in-kitchen. Plus, y’all have been asking for a DIY tutorial since I started blogging, and you know I can’t say no to you guys. Give the people what they want, right? So today, I am sharing my 10 step process for creating your very own banquette.

Don’t be scared, the carpentry can be done rather easily even if you are a beginner. The final result is well worth it. You might even start asking yourself why you didn’t think of it sooner. I know I can’t get over how much I love mine.
To get started I listed all the steps you need to follow in order to make your own banquette bench with storage plus a few tips that will help make your bench even better. Ready? Great, let’s go:
Grab supplies:
Ply wood and 2x4’s to measurements
Custom or Ordered Cushions
Leather Hanging Straps
Measure your space

As always when it comes to DIY projects like these, the first thing you need to do is measure! Determine the floor and wall dimensions to find the length you want the bench to run, then find out the ideal seat depth and height by using a dining chair as a guide. My bench is L shaped so I measured for each of the two walls where the bench would ultimately run parallel to. My Banquette dimensions are:
Longest length: 56”
Shortest length: 37 “
Bench depth: 19”
Bench height 17”
Rip down lumber to measurements

I used birch plywood to create the banquette’s frame. Start by ripping your boards down with a table saw in accordance to your required measurements. It would be great if you can find someone to help you with this particular step so that your helper can support the wood’s weight in the process. Safety first! You can even get your lumber cut down for you at Home Depot if you are not quite ready for this step.
Pro Tip: For an L shaped bench like mine, make sure you start with the longest side first and work measuring and cutting from there. I used a trim piece at the end for a more finished look. If you want to do that simply aim to measure from the edge of where you want the bench to be and then remove the thickness of your trim and ply board you will use to cover up the framing. In my case the trim details was 1” thick and 1/4” for the board overlay. Just be sure to take that into consideration.
Assemble the “L” Frame
For your 2x4 Frame simply cut two 2x4’s to the size you need to start. The length of my longest wall is 56” so I started there and cut two. (one for the front and one for the back) The depth of my bench is 19” So, I then cut two 2x4s to 15”, then simply placed them inside the 56” pieces perpendicularly creating a complete rectangle shape.
Once you have the frame laid out in front of you don’t be afraid to dry fit and make any minor cuts or tweaks that you need. Don’t stress. Just make sure you get the base of the “L” laid out properly first, then simply build on top of it. Don’t nail anything into the floor or walls yet! We want to make sure everything is perfect before doing so.
Be sure to include a center piece in each rectangle if you need the added support. Once you feel good about you placement of the base frame go ahead and nail and or screw them together and do the same for the top by mirroring what you just did, but attaching the shorter bench side to the longest piece. Just minus out the dimensions of the depth and attach the shortest side into the longest. You are already half way there!
Face the Frame

Next, we want to face your newly built bench frame by attaching the front, side, and bottom panels together using wood glue with 1x4 poplar. It’s thin and sturdy. First, add the back panel before adding both side panels. Once you have assembled everything properly, screw all the individual pieces together using 1” wood screws to reinforce the entire structure.
The key to this step is to ensure that each “face” is now covered with a properly fitting piece of wood. I like to do it piece be piece so that I don’t pre-cut everything and have an inch too much or too little. But, that’s just my style. Make sure each edge is seamless and fits snuggly at each corner flush before attaching with screws and wood glue.

Make the Lid
Using more of poplar, start framing the bench’s top lid and use the circular saw to cut the wood to the desired length and width.
Start by tracing the dimensions for your bench’s hinged top door, which will give access to the storage space in the banquette. Be sure to calculate the hinge’s size as well and jigsaw in a hole in which you can grab and lift. Since this lid will sit just inside the bench you will need something to grab to open.
Again,I like to have the lid rest flush just inside the frame on the 2x4 on each side.
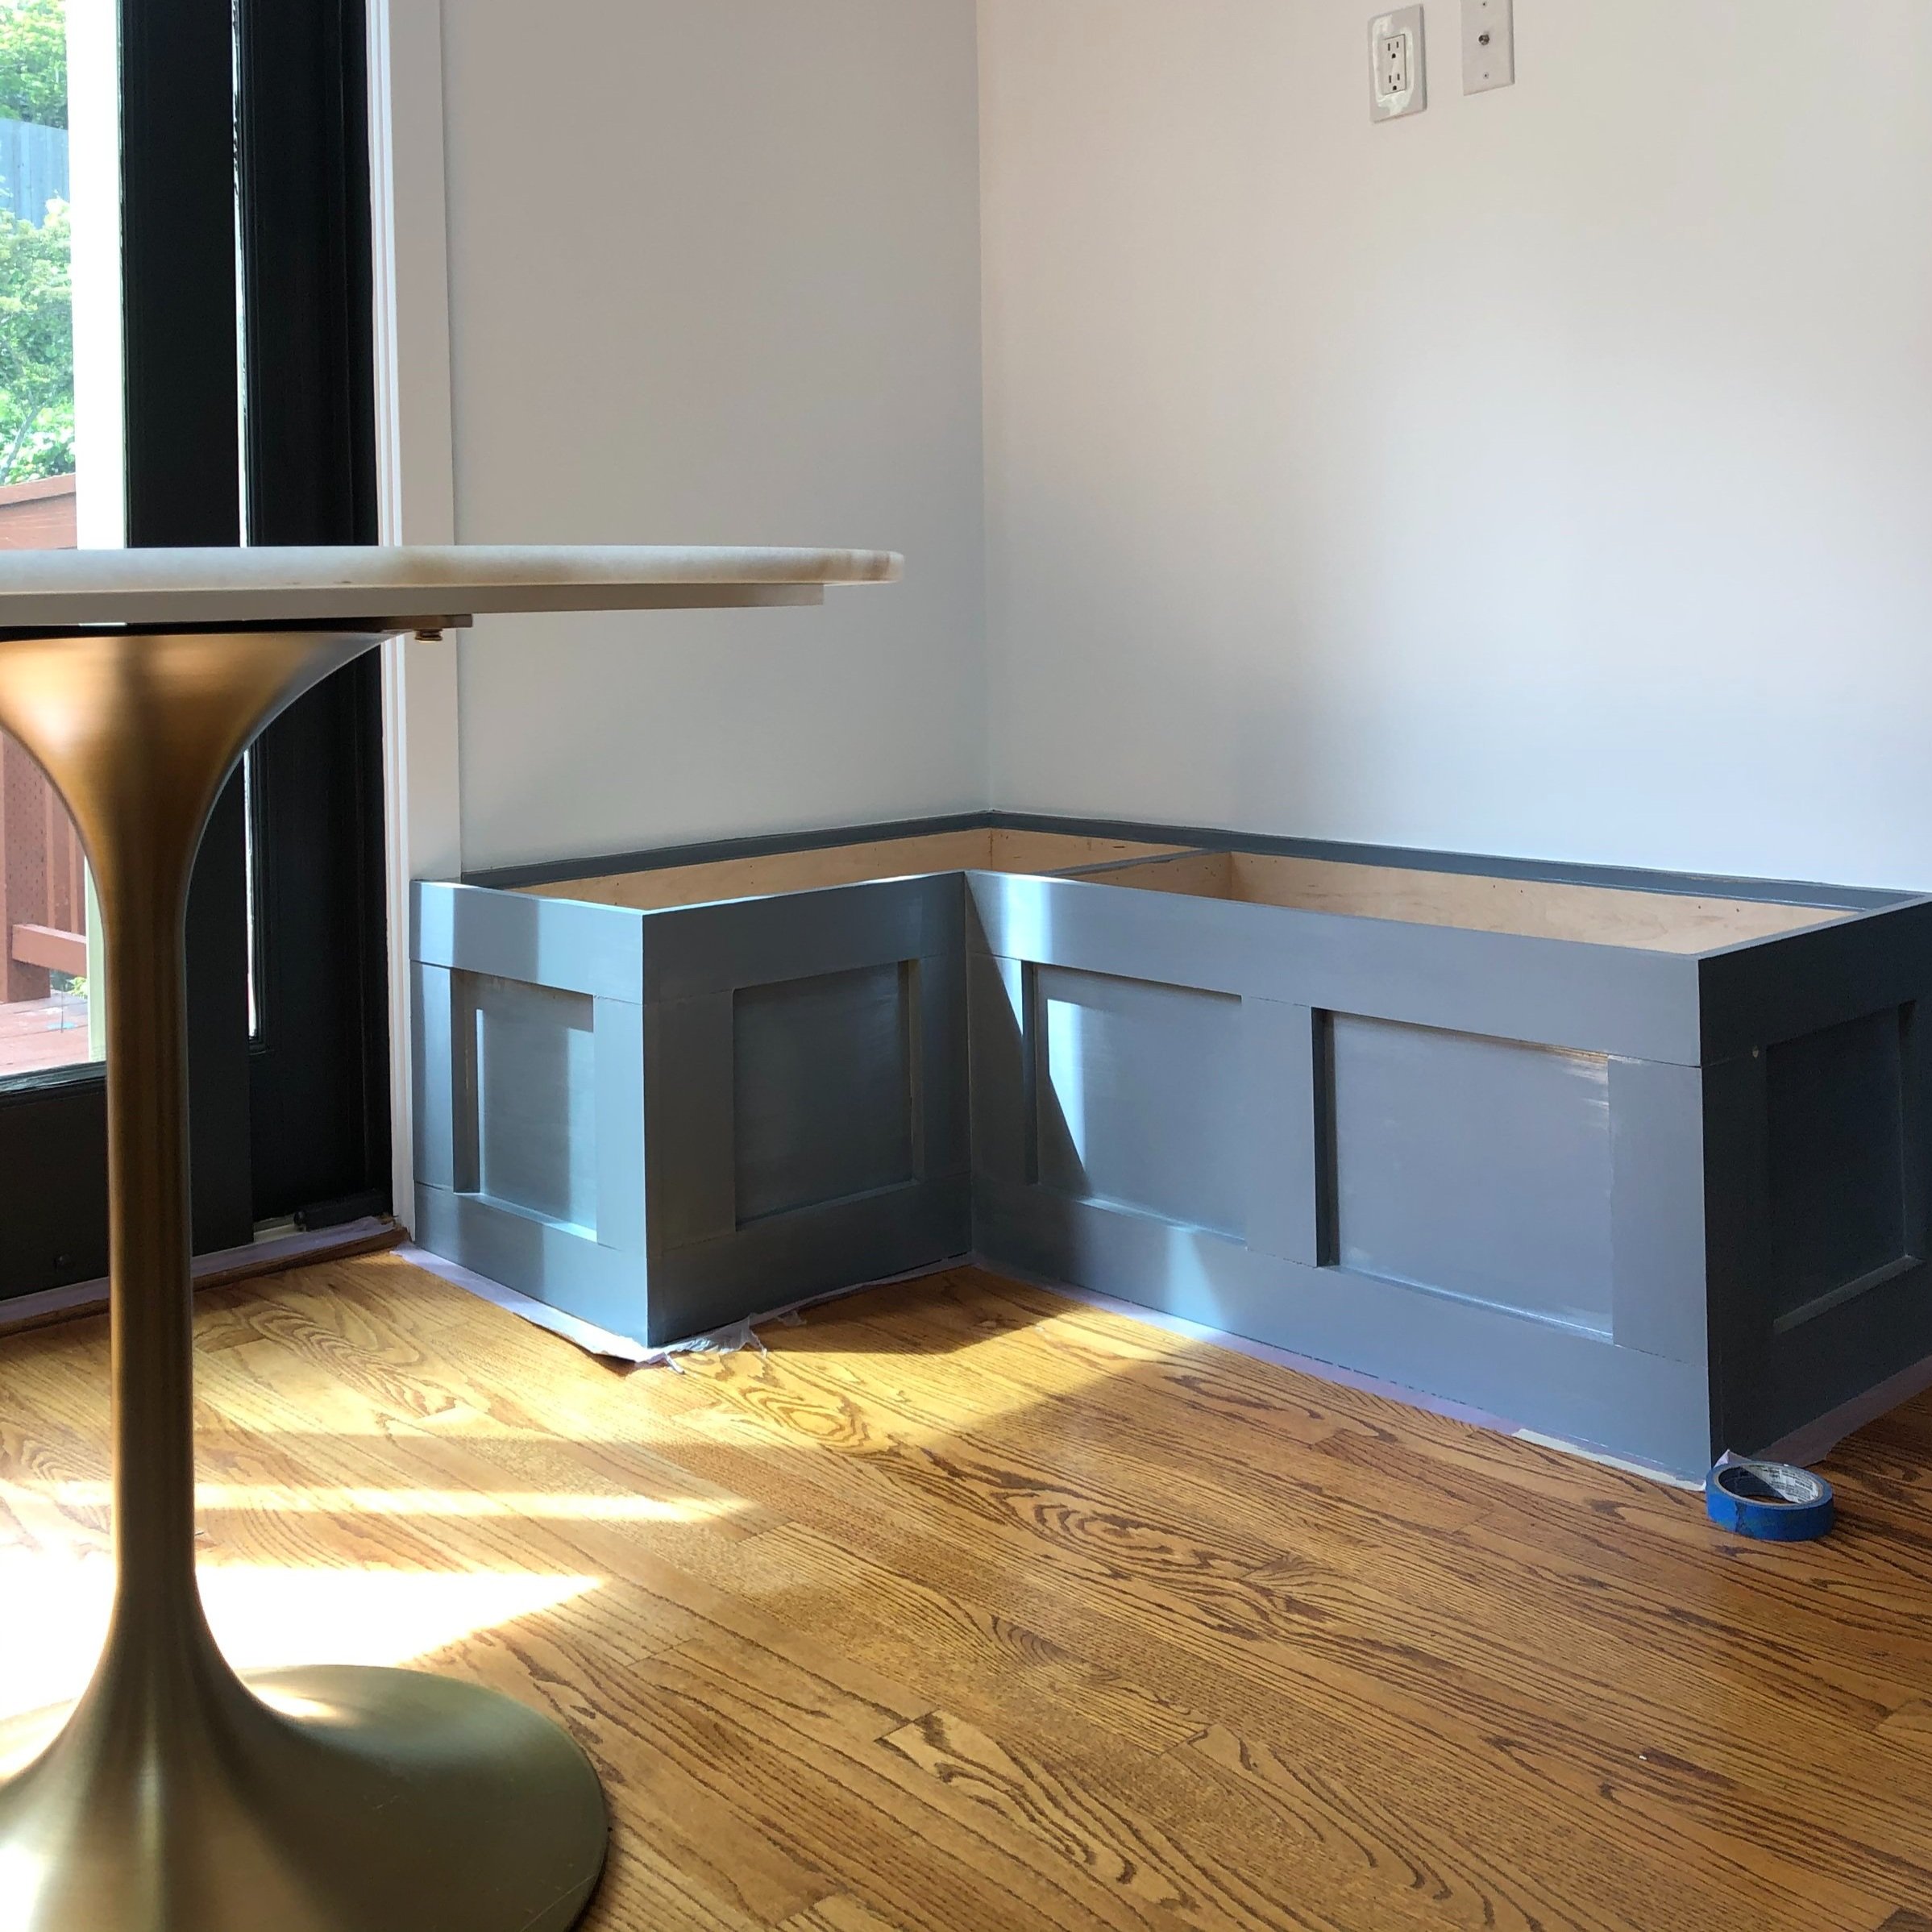
Install the Hinge

One dry fit simply attach a piano hinge inside the storage area of the bench, ensuring that it is perfectly flush with the door’s edge. I placed mine where the blue tape is seen above.
Test it out before committing and make sure it opens and closes as intended. If the lid is off slightly simply sand it down or make any cut adjustments. I like to have the lid resting on the back 2x4 because it provides extra support when someone sits on the banquette . After you get one lid cut to perfection, do another to complete the other side but remember that this will be either shorter or longer depending which lid you made first. Make sure they don’t bump into one another. See Below and notice two things; one that the lids are different lengths and two that the both sit flush inside the frame.
Install the bench

Now comes the exciting part! The next step is to install the bench. Ensure that the top surface is level by using my favorite level, then attach the bench to the wall studs by using wood screws that are approximately 3”. You can screw the base of the bench directly into your floors too. You don’t have to.
Adorn each face

To adorn the face the bench, you can always dress it up with bead board by simply cutting to the proper height then applying construction adhesive to the back before installing it with finishing nails etc.
Prime and Paint
I wanted a traditional yet modern look. To achieve that simply added a classic box frame detail around each face ,then primed and painted it by favorite black paint color for an ultra modern level up. Be sure to use paintable wood caulk if you have any seams where the bench meets the wall or where the framing is not exactly flush.
Lastly, fill any nail and/or screw holes with wood putty let dry and then paint or stain. I suggest two coats.


Towel Bar Back Cushions

Now, let me share with y’all a huge cost saving tip that looks like a million bucks. If you’ve seen the banquette before you can probably guess what it is. For extra comfort, try suspending cushions (more on that below) to provide back support using bathroom towel bars! Yes! towel bars. I know. I got my brass ones from Pepe & Carols in case you wanted to use the exact same ones I did. Simply order them to the custom length you need. Then install them with the provided screws, ideally into the studs at the height you need for the cushions to rest. Don’t forget to grab these leather straps to keep em in place.
I absolutely adore my DIY banquette bench and the addition of the suspended cushions just gives it an extra appealing element.
Get Custom Cushions Made
As for the cushions themselves, I had mine custom made by a local upholsterer. Guys, it was worth it and it took no time. They are filled with a foam insert and wrapped in the Golden Savoy Fabric. Go bold and make a moment! I am so glad that I did. Simply order them to your measurements taking into consideration the height of the wall and length you need.

I can’t wait for you guys to try this DIY and make your own banquette so you can experience it firsthand. Come on, tell me you’ll give it a try. It has been a space of pure joy ever since we did it. Tag @136home if you do on instagram. I want to see.
Never fear - For those that aren’t feeling brave, here’s a dupe you can purchase that’s readily made. You still need to solve for the cushions, but the base is ready to go! Just be sure to paint it in a gorgeous color to get it ready to match your beautiful home and select a fabric of choice to make it all your own. Xoxo
Need More DIY, Design, and Decor? Read on: